As we bid farewell to Universal Analytics, Google Analytics 4 (GA4) takes center stage in the world of analytics. It's time to embrace the new features and procedures that GA4 offers for a more insightful understanding of your digital landscape.
Background: In 1998, the journey began with Urchin, a foundational analytics tool. Google recognised its potential and acquired it in 2005, shaping it into Google Analytics. Over the years, Google Analytics evolved, but its structure became outdated. To cater to the evolving needs of marketers worldwide, Google introduced GA4, a fresh and highly customisable analytical platform.
Types of Events in GA4
Before delving into the setup process, we will explore the four types of events that GA4 can track:
Automatically Collected Events
Enhanced Measurement Events
Recommended Events
Custom Events
This guide primarily focuses on creating custom events using Google Tag Manager. Custom events empower businesses to dive deep into reporting, enabling them to track specific user interactions critical to their objectives.
Setting Up GA4 and Google Tag Manager 1. Linking Your GA4 Account to Google Tag Manager The first step in your GA4 journey is establishing a connection between your GA4 account and Google Tag Manager. This linkage forms an essential bridge for seamless data integration.
Creating the Configuration Trigger:
Access Google Tag Manager and navigate to your container.
In the "Triggers" section, initiate a "Page View" event trigger, which captures data from all pages on your website.
For clarity, label this trigger as "GA4 Configuration."

Creating the Configuration Tag:
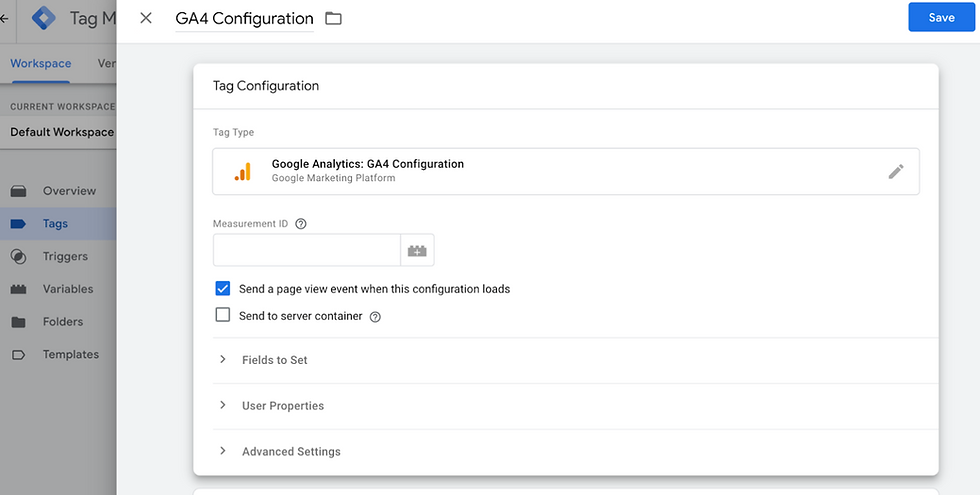
Under the "Tags" section, generate a new tag and select "Google Analytics: GA4 Configuration" from the available options.
Specify the measurement ID, retrievable from your GA4 property: Admin > Data Stream > Choose the relevant Data Stream > Copy the measurement ID (e.g., G-XXXXXXX).
Associate the trigger you created with this tag.
Ensure that you submit all modifications from the workspace.
With this foundation in place, you are now prepared to harness the full potential of Google Tag Manager for detailed reporting. 2. Creating an Event in Tag Manager Now that the GA4 configuration is established, let's dive into creating custom events. We'll illustrate this with an example of tracking internal clicks on your website, a feature GA4 doesn't natively cover.

Creating an Event Trigger:
Define the trigger to capture internal button clicks on your site. Depending on your button implementation, choose between "Just Links" or "All Elements."
"Just Links" tracks clicks from elements with <a> tags in the HTML structure.
"All Elements" extends tracking to images, buttons, and links.
Opt for "Some Link Clicks" since you have specific link clicks to monitor, allowing you to define the rules.
Employ the "Click URL" variable to verify if clicks lead within your domain.

Creating an Event Tag:
Name the event based on Google's suggested event names or devise your own while adhering to GA4 naming conventions.
Connect this event to the Configuration Tag set up earlier, and configure the parameters that GA4 should receive upon event activation.
Event Parameters:
Event parameters offer additional context to refine the event's significance within GA4:
The "Click URL" parameter captures the URL to which the button directs users.
Assign a parameter name for reference within GA4.
Define the value for each parameter, outlining the data to be sent from Tag Manager to GA4.
Save your configuration, link the tag with the trigger, and submit all changes from the workspace. Allow a 24-48 hour window for your events to populate within GA4. Customising Events in GA4 After the waiting period, you can locate your custom events in GA4. To further tailor these events to your needs:
Navigate to "Admin" and select "Events" to access a list of all events.
Identify your custom event (e.g., "internal_click").
If you wish to track specific interactions, such as a "Get in touch" button, initiate a new event in GA4 by clicking "Create event."
Provide a descriptive name (e.g., "get_in_touch") and set the event name as "internal_click" to establish a connection with the broader event.
Incorporate parameters created in Tag Manager, like "link_url," and specify the precise page to which the button directs users.
Save your event configuration and grant a 24-48 hour period for your custom event data to appear in GA4.
Congratulations! You've successfully configured GA4 and crafted custom events using Google Tag Manager. These tailored events will empower you to uncover invaluable insights and make data-driven decisions, enhancing your digital marketing strategies.
If you're seeking personalized digital marketing strategies that leverage the latest tools, including GA4, please do not hesitate to reach out to Digital Zebra, a marketing agency specialising in engaging specific audiences. We are poised to assist you in harnessing the capabilities of cutting-edge analytics tools, including GA4.

Comments